I’m currently using Siril as my main stacking and processing tool. And this is the basic workflow that I follow:
- Stacking
- Background Extraction
- Remove Green Noise
- Photometric Color Calibration
- Stretching
- Star Processing
- Recombination
- Contrast/Saturation/Hue
I’ll go through all these steps and explain what I did and why.
Stacking & Background Extraction
Here is an example of an untouched photo that comes out of the camera.

This photo was a five minute exposure behind the L-eNhance dual band filter. This looks quite impressive, but there are issues with it. It’s difficult to see in the compressed JPEG, but there is glow in the center, some splotching, and a light leak on the upper right hand side. Also, the detail just doesn’t pop. The image is also overly green because camera sensors have more green sensors than red and blue. Not in this frame, but also common are satellite and aircraft trails. This is why we stack images, by combining multiple images together, the finer detail will begin to rise out of the background noise. We can help reduce this noise by using calibration shots, darks, flats, and biases.
First, the darks. This is a master dark frame that was created by summing 20 frames taken at the same exposure length and temperature as the lights, except the lens cap is on. This basically shows what your “zero” level noise is on a five minute exposure. Notice it captured the light leaks. I will try to reduce those for future shots, and create a new set of master darks. The master dark set does not have to be reshot for every session, but can be used anytime the for same exposure temperature and time.

The flat is shot at a blank image, such as an empty sky, an all white display iPad, or in bright light with a white cloth covering the telescope. The target is to saturate the sensor to approximately 50%. This helps allows the stacking software to compensate for the unevenness of the light or for imperfections in the image, such as dust particles. The flats need to be redone anytime the image train is disturbed, and should be redone quite frequently to account for dust and contamination. I used N.I.N.A’s flat creation wizard to create the flat, which automatically calculates the exposure time based on the histogram target, and then takes 10 images.

The darks are easy. They measure mostly the sensor read noise, and are useful for isolating bad “hot” pixels. Darks are created by taking a large number, 200 in this case, of exposures with the lens cap on. This is measuring as close as possible to what the sensor reads with no light hitting it. Darks are a function of the senor only, and can be reused for a long time to calibrate shots at the same temperature. They need to be periodically reshot to account for the sensor aging, but often this is done on a yearly or less basis. Again, the light leak was there, which is not ideal.

Now for the actual stacking. I used the basic included script in Siril, which I modified to include a linear background extraction on a per frame basis. This eliminates the need to do a separate background extraction, either in Siril or with a tool such as GraXpert. So I simply need to place all my lights and calibration shots in the proper directories, and run the script. The result is below, in an autostrech view.

Color Calibration
The next step is to apply two simple tools in Siril, “Remove Green Noise” and Photometric Color Calibration. Remove green noise is the simple click of a button. Photometric color calibration is a little more involved, the image needs to be plate solved, and then known data sources, primarily Hubble data, will be used to adjust the levels. The results is below.

The next step is to stretch the image. All the above views are shown in autostrech mode, which is basically the computers rough guess at where how the image should be stretched. So in Siril the commonly recommend procedure is to used the Hypebolic stretch to stretch, then the histogram tool to knock the image back down, and repeat until happy.

Star Processing & Contrast Adjustment
One of the issues remaining issues with this image is the large number of stars, they are overwhelming the nebula. We want to just tame them a bit to help the nebula pop. This is actually also really easy to do with the help of a few tools and a great script created by Rich at Deep Space Astro. You need to get the command line interface (CLI) version of the Starnet ++ plugin, and then the Siril script will use that to remove the stars, create and adjust the starmask, and replace the stars. The goal is approximately a 25% star reduction, and the tool can be run multiple times. There are detailed instructions in the Siril docs. This should be run on a stretched image.

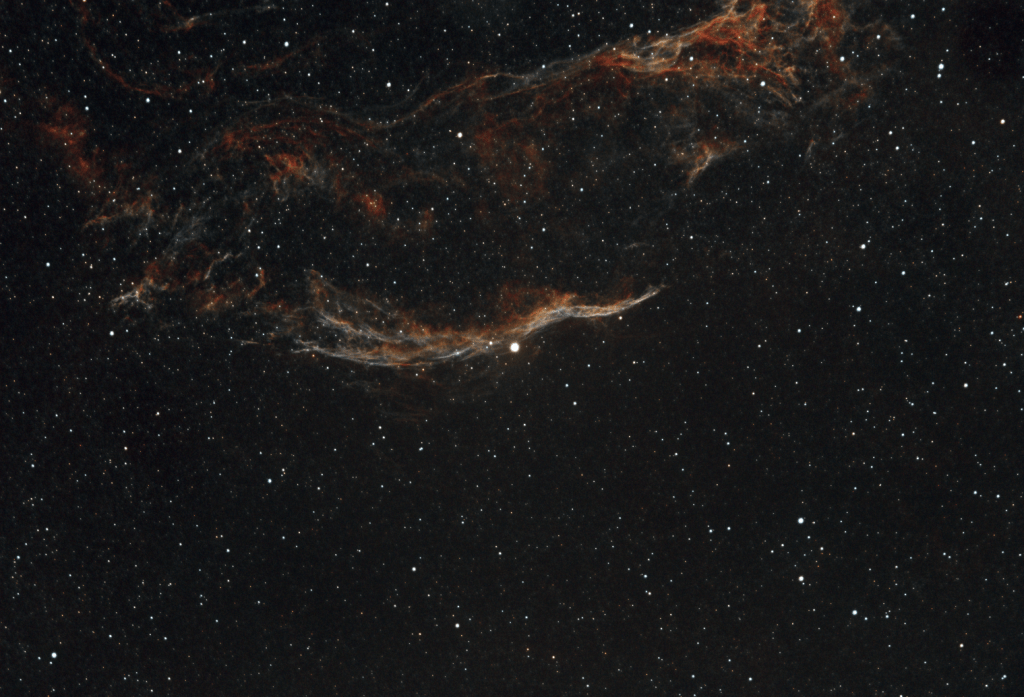
The final step in this process will be two adjust the contrast and saturation. Siril has some basic tools, GIMP has more extensive tools; in this case I was happy with the basic tools, so I just completed the adjustment in Siril.


Leave a comment