So, how long and how many exposures should you take? That’s a question that most astrophotographers seem to handle with experience and guess work, but there are some numbers you can look at.
I will detail my equipment in a separate post, but the important thing to know for this discussion is that I shot unguided with an unmodified Canon DSLR. Part of the deal with photographing astronomical objects is that they are in apparent motion at all times due to the rotation of the Earth. On a stationary tripod stars would start to show trails after about 10 seconds of exposure. The next step up is a tracking mount; which I was using in this case. Errors in alignment and mount accuracy will limit how long tracking can be done without additional correction. It took a little trial and error, but eventually I established 45 seconds as the threshold that would consistently give round stars. The next step up in this direction would be to guide with an additional camera. Depending on the quality of the setup, guiding will allow multiple minutes of exposure time, and if done well enough guiding will no longer be the limiting factor.
Since I decided on 45 second subs, the next question to answer is, How many to take? Let’s look at a sub.

Let’s also look at the histogram.

The histogram is shifted very close to the left side, probably between 5 and 10%. A good rule of thumb is to shoot for a histogram peak at approximately 25%, so this image is underexposed…as expected. Remember I wanted to shoot longer, but was guiding limited. You should also check the number of saturated pixels. Saturated pixels can no longer gather data; stars will tend to saturate, but you want to keep that to a minimum. “A minimum” isn’t necessarily a set number of pixels, some say no more than 1000 pixels, others say less or more. Hot pixels will also play a factor here, they will get counted as saturated. But overall, maybe a number isn’t too important here, just keep an eye on the hot spots and make sure they aren’t too bright relative to the detail you are trying to draw out.
So how does this help figure out how long to shoot for? There isn’t really a good equation or parameter you can look at. You just have to stack and see how it comes out. Are you getting the detail you are expecting? The colors? If you don’t like it, you need more time. The general properties that govern signal to noise ratio tells us that we can expect the signal to noise ratio to double with the square of exposure time…in other words if we want to double the signal to noise ratio of a four hour photo we need to add an additional 12 hours of exposure time. This doesn’t tell us the whole story, the noise is complicated and multi-sourced and we aren’t necessarily looking directly at the SNR when we examine a test stack. What this does mean, is that if we have taken several hours of data, and we still need dramatic improvement, expect to need something closer to the square of the time not simply adding an hour or two.
Calibration Data
This next part is going to be software specific. I used Siril in script mode, if you use other software the requirements will be different. Siril requires lights, darks, flats, and bias all in separate directories. I’ll go through these one at a time.
Lights. Are your target photos as discussed above.
Flats. Flats are used to calibrate the aberrations of your optical train; dust, scratches, shadows, etc. You take flats, ideally with your sensor at the same temperature as when you gathered the lights(cooled astro-specific cameras really shine here), at a diffuse white light source. Ideally you time your exposure to saturate your sensor to 50%. Flats need to be reshot any time the optical train is disturbed, and shot be if any significant amount of time has passed to account for dust or other transient factors.
Darks. Darks are used to calibrate sensor noise, ie. they show the what the sensor reads at the “zero” level. They are taken with the lenses cap on, ideally at the sensor operating temperature, at the same gain and exposure time. Darks are sensor specific, not affected by the optical train, and don’t have to be updated that often.
Biases. Biases are to capture the sensor read noise. They are also shot with the lens cap on, but they are shot at the camera minimum exposure time. They also do not need to be frequently retaken.
Stacked Result
So the only other quirk here is that I prefer to do frame by frame background extraction during the stacking process. In Siril this is accomplished by adding the line
seqsubsky pp_light 1
to the script file. That automatically extracts a linear gradient from every frame. Gradients are caused by light pollution, the moon, etc, so they can often change throughout a shooting session or sessions. The linear gradient extraction helps reduce the gradient complexity in the final image, often no further extraction is needed.
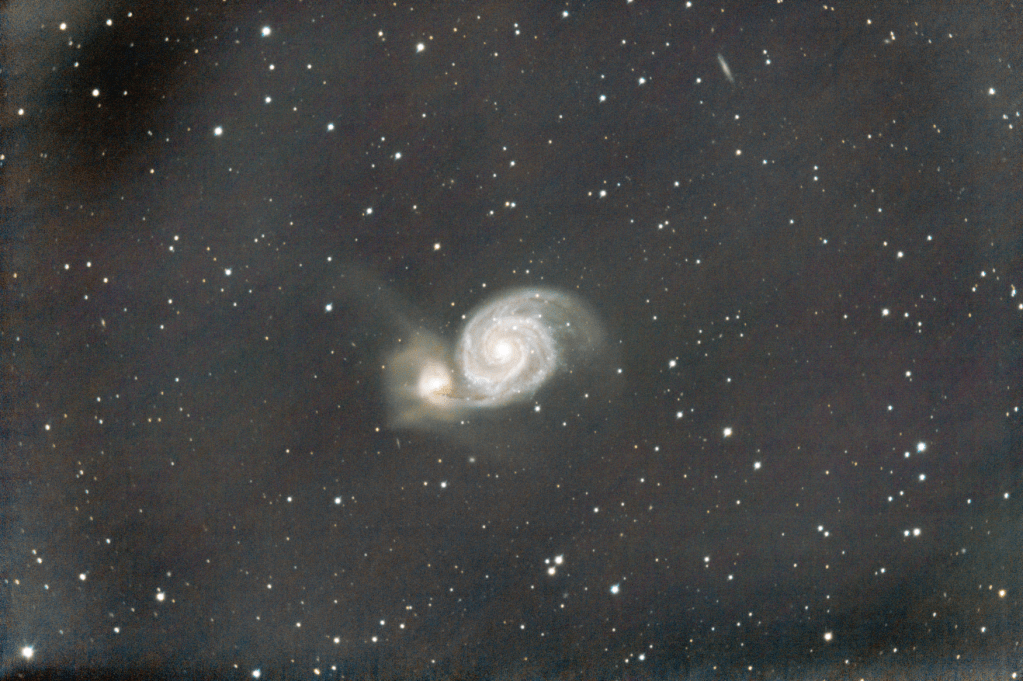
So how long did I shoot for? Approximately 15 hours over three nights. After the 2nd night I just wasn’t happy with the result, so I added a 3rd. The image popped after the 3rd night, and I was quite happy with how it came out.
This is what the raw stack looks like in autostretch mode after the first stack. The detail is readily apparent, and we’re ready to go to work cleaning it up.


Leave a comment